
IoTplot terminals are represented as units in the work list. You can rename units in the unit properties, General tab. Only units presented in the work list can be displayed on the map. Units may also be organized into groups in the work list.


Each of these lists is independent, and their settings are stored separately. When you switch between them, all settings that were last applied to this type of list are restored.
To search for the required units in the list, use the dynamic search above it. The search is carried out by unit name, group name and such profile properties of the unit as VIN, vehicle type, registration plate, brand, model, year, and color.
Unit list
You can perform the following actions in this mode:
- add units to the work list and delete them from it;
- sort units by various parameters.
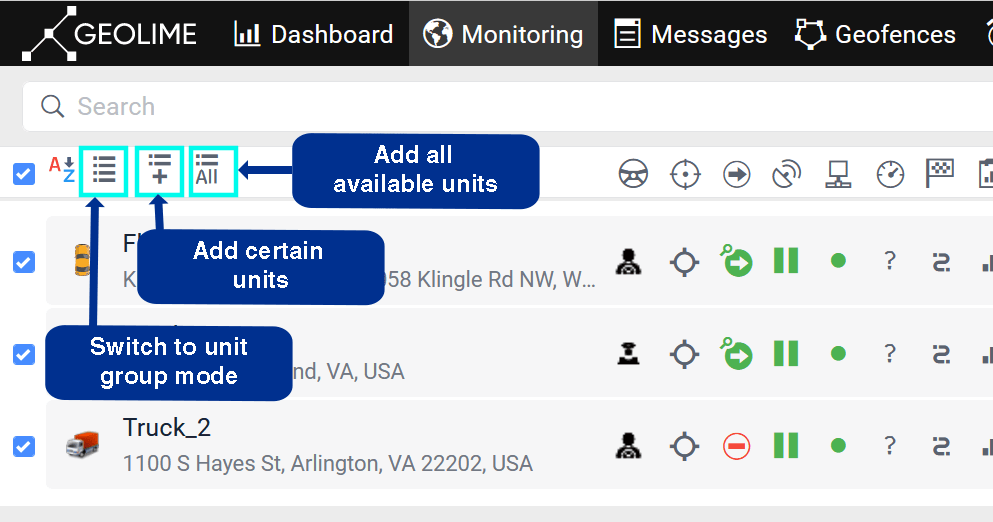
Adding units to the work list
To add units to the work list, use the following buttons in the header of a list:
 : add all units available;
 : add particular unit(s) using the search tool. More below.
Removing units from the work list
Units can be removed from the work list individually or all at once:
 : the button next to each unit to remove this particular unit from the list;
 : the button in the header of the list to clear the work list (to remove all units).
Note that deleting units from the work list does not lead to their deleting from the system. They can be added back to the work list using the ways described above.
Sorting
By default, the work list is sorted by names arranged in direct alphabetical order. The order can be reversed. To do this, use the switch button  or
or  in the header.
Units can also be sorted by motion state, connection quality, etc. To do this, use the buttons in the header:
 : motion state;
 : last message time;
 : quick track;
For instance, to sort units by the motion state, use the button . The list is rearranged in such a way that all the moving units appear at the top of the list, and those that are not moving appear at the bottom. To reverse the motion state order of units, click on the button again.
The presence or absence of certain columns is adjustable in the customizer of monitoring options.
Unit group list
In this mode, the units from the work list are shown by groups. Next to the group name, you can see the number of units in it. The group tooltip displays the list of the units that belong to this group.
The groups and units selected in the list are shown on the map.

In the list, you can perform the following actions with group:
| Icon | Action |
|---|---|
|
|
Expand the group to see the units belonging to it and information about them. |
|
|
Collapse the list of units for the group. |
|
|
Sort groups by name in direct or reverse alphabetical order. |
|
|
Add a certain group or unit to the work list. Read more here.
If you add a unit that doesn’t belong to any group, it gets into the Units outside groups group with the icon |
|
|
Add all the lacking groups and units to the work list.
If there are no units in the group, it is not added to the work list using this icon. |
|
|
Add the remaining units of the group to the list. This icon is shown at the end of the expanded group list only if some units belonging to the group are not shown in the list. You can see the number of the lacking units in the tooltip of this icon. |
|
|
View or edit the unit group properties. |
|
|
Clear the list/Delete the group or the unit from the list. This action doesn’t lead to the deletion of units from the group and from the system. |


Searching and adding units
There is a convenient tool for finding units and adding them to the work list. To open the tool, click on the icon in the work list header.

In the window that opens, all the unit groups (in square brackets) and units available to the user are displayed in alphabetical order.
Adding units
You can add a unit or a group with its units to the work list in one of the following ways:
- double-click on the object;
- add all the found (filtered) objects using the icon
 ;
; - replace the existing work list with all the found (filtered) objects using the icon
 .
.
If the added unit belongs to a certain group, then this group is also added to the list but without the rest of its units. If the unit doesn’t belong to any group, then it is automatically added to the Units outside groups group with the icon  .
.

Searching by criteria
If you have a lot of units and groups, you can use filters to search for the required object. The following filtration criteria are available:
| Filter | Description |
|---|---|
| Name | Search by the unit or group name. |
| Unit group | If you specify the group name in the search field, the list shows only those units that belong to this group. |
| Unit | If you specify the unit name in the search field, the list shows only those groups to which this unit belongs. |
| Profile fields | Search by the characteristics specified on the Profile tab of the unit properties. |
| Geofences | Search by the name of the geofence in which the unit is currently located. |
| Drivers | Search by the name of the driver associated with the unit. |
The filters can work on several levels:
- at the first level, you select a filtration criterion and the list shows only those units which have the selected property. For example, if you select the Sensors filter, the list shows only those units for which they are created;
- at the second level, in the search field next to the filter, you specify one or several keywords (their masks) separated by commas. For example, to find all units with temperature and humidity sensors, you can select the Sensors filter and specify *temp*,*humid*;
- at the third level, you can add one more filtration criterion by clicking on the icon
 and search among previously filtered units, etc.